
How to transcribe voice memos on iPhone, with speaker names
Save the memo to Files, upload it, name the speakers and export a document. A walk-through on a two-person sample memo, from iPhone or Mac.

Armin
Published 7 min read

Key takeaways
- iPhone's built-in transcript is fine for a quick note; upload the memo when you need speaker names or a file.
- Voice Memos saves an .m4a file to Files, which uploads as it is.
- Turn on speaker labels and give the number of people before you transcribe.
- Rename Speaker 1 and Speaker 2 once and every paragraph updates.
- Export the transcript as Word, PDF, TXT, Markdown, SRT or VTT.
Your iPhone can already show a transcript of a voice memo, and for a quick note to yourself that may be all you need. When the memo has two or more people in it, or you want a document you can edit and send, it pays to upload the recording instead. Here is how to transcribe voice memos from iPhone or Mac into a transcript with each speaker named, shown on a two-minute sample memo I ran through it on November 16, 2026.
What Voice Memos' own transcript gives you
From iOS 18 on, Voice Memos transcribes recordings on iPhone 12 or later. Apple's iPhone guide (checked November 16, 2026) lists English, Spanish, Portuguese, Italian, French, German, Japanese, Korean and Chinese (Simplified and Traditional), and says the feature isn't available in every country or region. To see it:
- Open Voice Memos and tap the recording.
- Tap the More button (three dots).
- Choose View Transcript to read it or copy a part, or Copy Transcript to copy all of it.
On a Mac, click the recording in Voice Memos, then the Transcription button. You can search your recordings by the words in their transcripts, and paste the text into a document yourself. What you don't get is who said what: the transcript has no speaker names, and the copy is plain text. For a conversation you need on record, the steps below add both, and they also work for memos in languages outside Apple's list.
How to transcribe voice memos from your iPhone
The memo has to leave Voice Memos as a file first. Save it to Files, then upload it from there.
1. Save the memo to Files
- In Voice Memos, tap the recording.
- Tap the More button, then tap Share.
- Scroll down, tap Save to Files, choose a folder such as On My iPhone or iCloud Drive, then tap Save.
Apple saves the memo as an .m4a file by default. Leave Options as it is; you don't need the Editable version here.
2. Upload it in the app or in Safari
- In the PrismaScribe iPhone app: tap Upload, choose Files and pick the memo. Check that Identify Speakers is on, set Number of Speakers if you know it, and tap Upload & Transcribe.
- In Safari: sign in at prismascribe.ai, tap Transcribe Files and choose the memo from Files, then use the settings in the next step.
The uploader takes .m4a as it is, so there's nothing to convert. The voice memo to text page lists the other phone recordings it takes, WhatsApp voice notes among them.
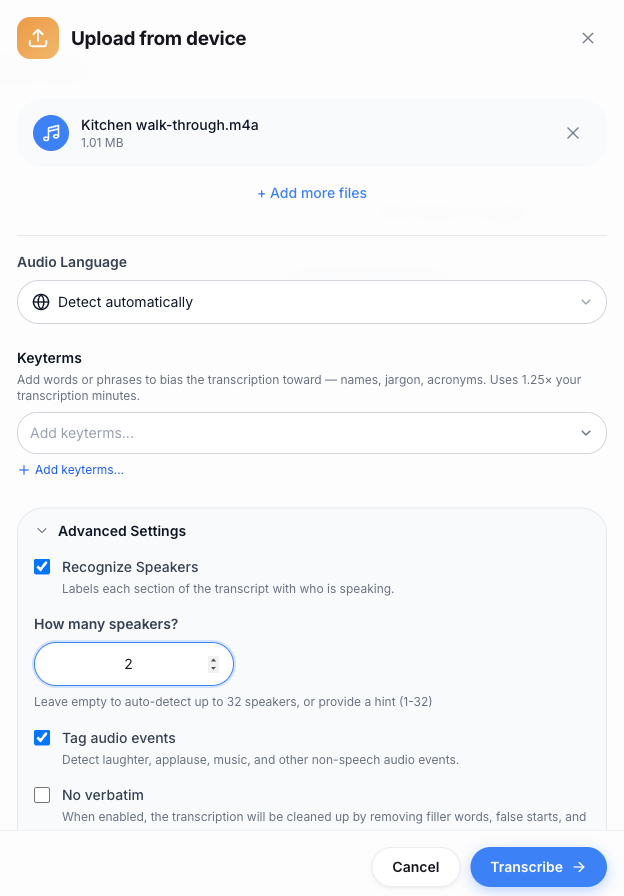
3. Turn on speaker labels before you transcribe
In the web upload window:
- Open Advanced Settings.
- Check that Recognize Speakers is ticked. It was on by default in my run.
- Under How many speakers? type the number of people, or leave it empty and it finds up to 32 on its own.
- Press Transcribe. About an hour of audio takes about 2 minutes, and you can close the page while it runs.
How to transcribe voice memos on a Mac
On a Mac the steps are shorter, because you can drag the file out.
- Open Voice Memos on the Mac. With Voice Memos turned on in iCloud on both devices, the memos you record on your iPhone appear here too.
- Drag the recording from the Voice Memos window into a Finder window. That saves it as a file in the folder you dropped it in.
- Open prismascribe.ai in your browser, click New Transcription, then Transcribe Files, and drop the file into the upload window.
- Set the speakers as in step 3 above and press Transcribe.
Paste a link, get a searchable transcript
Free plan includes 30 minutes of transcription every month. No credit card.
The rest of this guide happens in the browser, on a Mac or PC or in Safari on the iPhone, since every transcript you upload opens at prismascribe.ai.
The test memo: a kitchen walk-through
For this guide I made a sample memo of the kind people record on site visits: Megan Fairley, a homeowner, walks through her kitchen with her contractor Rob Kessler before a renovation. Both people are invented, and their voices are synthetic, two speakers saved as an .m4a like the files Voice Memos makes. The file is Kitchen walk-through.m4a, 2 minutes 7 seconds long and 1.01 MB.
The settings I used:
- Audio language: Detect automatically (it picked English)
- Recognize Speakers: on, with 2 speakers
- Tag audio events: on, the default, which marks things like laughter and applause
- No verbatim: off, so every word stays in
- No keyterms and no noise removal
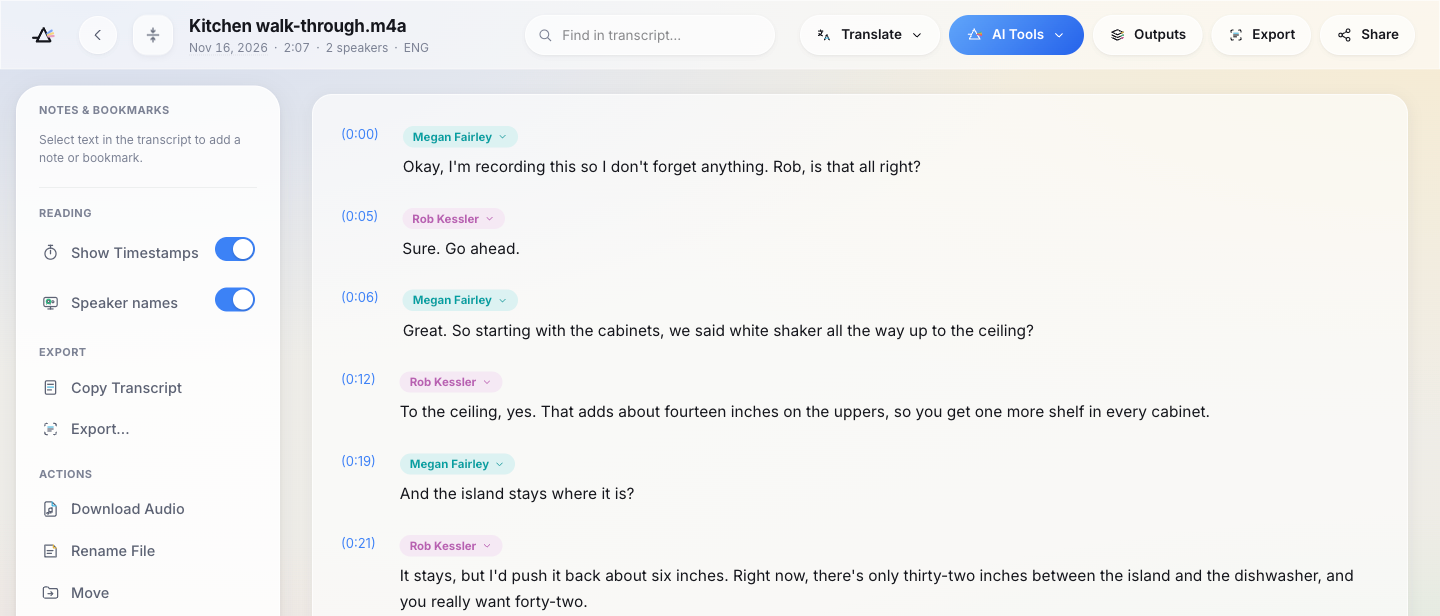
It found both speakers and split the talk into 27 paragraphs, each with a timestamp, and every paragraph went to the right person. Two long turns, Rob's advice on countertops and Megan's recap at the end, were each cut into two paragraphs mid-sentence, with both halves under the right name. Real memos with crosstalk, or a voice far from the phone, can put a paragraph under the wrong speaker now and then; the speaker menu below moves it back.
Here is one paragraph as Copy Transcript gives it, after naming the speakers:
(0:21) [Rob Kessler] It stays, but I'd push it back about six inches. Right now, there's only thirty-two inches between the island and the dishwasher, and you really want forty-two.
The run used 3 minutes of the monthly allowance. Minutes are counted per file and rounded up to the next whole minute, so a 2:07 memo counts as 3.
Name the speakers once
The first version of the transcript says Speaker 1 and Speaker 2. Megan asks "Rob, is that all right?" in the first line, which makes it easy to tell who is who. To rename a speaker:
- Click the speaker label above any paragraph.
- Click the pencil next to the speaker's name.
- Type the real name, keep All paragraphs selected and click the check mark.
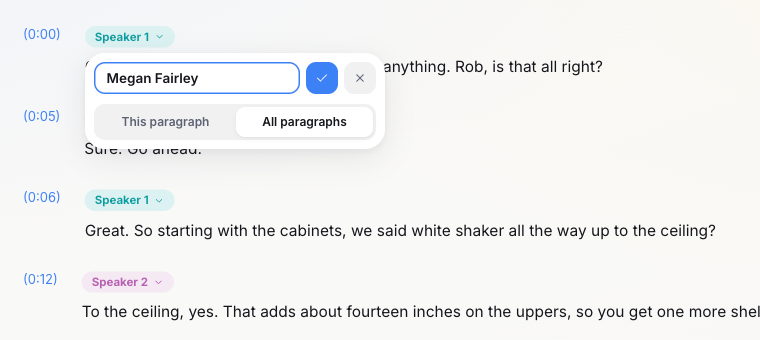
Every paragraph that speaker said changes at once. Pick This paragraph instead when only one paragraph needs a different name. The same menu moves a paragraph to the other speaker, adds a new speaker or unassigns one. The speaker identification page explains how the labels are worked out.
Edit and export the transcript
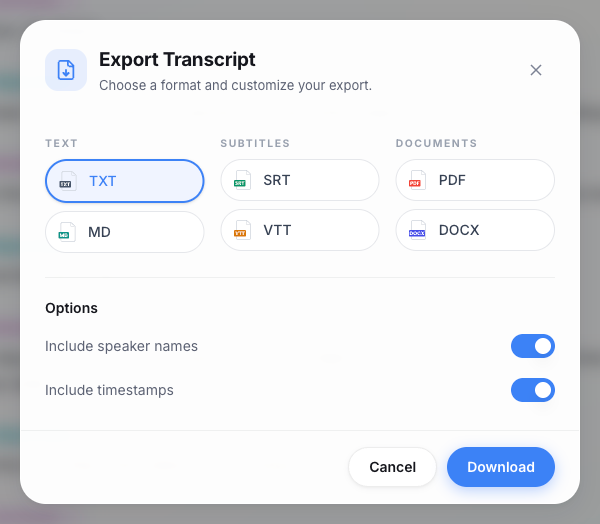
Click into the text to fix a name or a number; your edits save automatically. Then open Export. The window groups six formats:
- Text: TXT and MD (Markdown)
- Subtitles: SRT and VTT
- Documents: PDF and DOCX (Word)
Two switches, Include speaker names and Include timestamps, decide what goes into the file. Both were on by default. The TXT file of the test memo opens with the file name, language, duration and date, then lists each turn under the speaker's name with its timestamp. For a memo you'll send to someone, Word or PDF is the usual pick, and this guide to a finished Word document covers headings and paragraph breaks.
Tips for memos that transcribe well
- Put the phone between the speakers, a little closer to whoever speaks more softly.
- Say names early. A "Rob, is that all right?" in the first seconds tells you later which label is which.
- Give the exact number of speakers when you know it; otherwise leave it on auto.
- Try No verbatim for rambling memos. It removes filler words and false starts. Leave it off when you need quotes word for word. It isn't offered for every language.
- Check the length. On the Free plan a file can be up to 15 minutes. Paid plans take files of five hours or more and add Remove background noise for a noisy room (it counts twice the minutes) and Keyterms for names and jargon (1.25 times). Compare the plans for the details.
- Skip the export next time. The PrismaScribe iPhone app records and transcribes in one place.
Voice Memos is still the quickest way to catch a conversation on your phone. Save the memo to Files, upload it, and you get back a transcript where everyone has a name, ready to send as a document.
Frequently asked questions
Why is there no transcript on my voice memo?
Apple's own transcript needs an iPhone 12 or later on iOS 18 or newer, a recording in one of the languages Apple lists, and a country or region where the feature is offered. If any of those is missing, View Transcript doesn't appear. Uploading the memo works on any iPhone and in 99+ languages.
Can I transcribe voice memos for free?
Yes. The Free plan includes 30 minutes of transcription a month, up to 15 minutes a day, with files up to 15 minutes and 500 MB. Speaker labels and all six export formats are included.
Can I transcribe a voice memo longer than 15 minutes for free?
The first 15 minutes of a longer memo are transcribed on the Free plan. For the whole recording, top-up hours lift that limit and never expire, and paid plans take files of five hours or more.
Does it work for voice memos in other languages?
Yes. It transcribes 99+ languages and detects the language on its own, and you can translate the transcript afterwards.


Turn hours of audio into searchable text
Upload a file or paste a link. Speaker labels, translations, and six export formats included.